
One of the things I love about the sailing co-op Evan and I are part of are the haul-outs. Like a lot of people, I actually don’t care for haul-outs very much. So, the fact that 20 people can show up and blast through all of a boat’s projects in one weekend is my idea of doing hard work right. On one recent haul-out project I spotted something that made the crew think our efforts were about to grind to a halt.
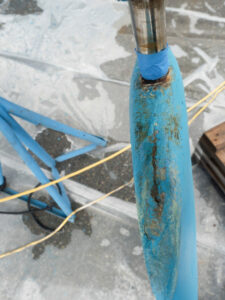
Our co-op owns six Catalina 27s of various vintages. Despite lots of maintenance and TLC, occasionally their age shows. This time it was SV Weekend Pirate’s rudder that displayed the wear and tear of 30ish years of sailing. When I inspected the rudder with a flashlight I noticed it had a hairline crack. Initially it appeared as a damp jagged line on the top of the leading edge, but after a bit of investigation (and some wire brush scrubbing) I found that most of the seam on the top of the rudder had begun to open up.
While the damage didn’t appear catastrophic, we obviously couldn’t put her back in the water. Some of the crew assumed we needed a new rudder—before we took that step, I suggested we do more investigating.

Construction
To understand our options, we needed to revisit rudder building 101. In a production boat like our Catalinas, a rudder is typically sandwiched together using port and starboard outside skins—think of it like two halves of a clamshell but made out of fibreglass. Then the rudder stock and the metal stiffeners are fibreglassed to one inside skin. The other side of the shell is put in place and the centerline seam is fibreglassed together. To fill the hollow shell, expanding high-density foam is injected into the rudder and then the injection point is sealed.
What Can Go Wrong?
Rudders like this can last years. However, there are things to watch out for. If you suffer a large impact from hitting a big log or running aground on a reef (as our friends did in the Indian Ocean), be sure to inspect the rudder. Check that the rudder stock hasn’t been bent and that the rudder blade hasn’t suffered damage. Keep in mind that even small impacts can crack a rudder’s seam. Repeated flexing can break the fibreglass bond to the shaft and water can leak into the rudder.
If water stays trapped inside the rudder long enough it can cause corrosion of the metal stiffeners. When this happens the welds may fail and the stiffeners can detach from the rudder stock. One sign of this is if you move the wheel or tiller and the rudder stock moves, but the rudder sluggishly follows or doesn’t turn at all.
Trapped water can freeze when a boat is stored ashore during winter. The expanding ice can split the rudder along its previously glassed centreline seam. Sometimes you’ll see bulges in the side of the rudder with no split. This is often more of a problem on the East Coast where boats are more commonly stored ashore for winter.
A simple test for water in a fibreglass rudder is to drill a 1/4-inch (six-millimetre) hole through one side, close to the bottom of the rudder. Use a cordless drill to avoid electrocution from water splashing over the drill. If water starts trickling out you should start checking the rudder’s seams.
Sometimes the damage isn’t to the rudder itself, but to the rudder stock. This metal shaft can suffer crevice corrosion where it enters the bottom of the boat (where a seal or bearing is located). When this area of stagnant seawater becomes low on oxygen it can allow the stainless steel to form pits. It’s a good idea to occasionally lower the rudder a few inches and inspect this area for this type of problem. Anything more than localized mild pitting, 1/16-inch (one-millimetre) deep, should be further inspected by a surveyor or boatbuilder. About every five years is a reasonable inspection frequency.
Our Problem
In the case of Weekend Pirate there was no play in the rudder and after drilling a hole in the rudder’s lowest point we saw no sign of water inside. If there had been water or play inside the rudder, we would have wanted to evaluate further by opening up the fibreglass skin to ensure the stock and stiffeners were still secure and in good condition.
This was the case with our friends’ rudder when it was damaged in the Indian Ocean. The initial damage had detached the rudder stock and stiffeners from the foam and the foam had lots of voids in it. Normally a rudder like this would need to be replaced, but considering they were 1,100 miles from a boatyard the only option was to rebuild the rudder using on-hand supplies. Namely coconut husks (also known as coir) mixed with thickened epoxy.
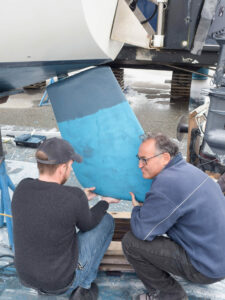
Thankfully, in the case of Weekend Pirate we caught the problem early. As we cleaned up the cracked seam, it appeared that the crack was due to age and not an impact. The first step was to lower the rudder enough so that it could be comfortably worked on. This had the added bonus of giving us an opportunity to inspect the rudder shaft for signs of pitting or bending.
With the rudder lowered, we blocked it in place and then opened up the seam—removing loose fibreglass and cleaning out old paint and salt residue. Once it was dry we used 80-grit sandpaper and sanded back through the old bottom paint, gelcoat and fibreglass layers. Our goal was to have a smooth transition which covered several inches from the seam to the bare fibreglass skin. Be aware of not nicking or damaging the rudder shaft while you work. By wrapping it in a layer of tape you can protect it from accidental hits from the sander.
The next step was to rebuild the seam and make the rudder waterproof. First, we used a Dremel tool to enlarge the crack and to determine how thick the rudder shell was. The goal of the new fibreglass layers is to match the thickness of the existing shell. A simple rule of thumb is wetted out nine-ounce fibreglass cloth equals 0.013 inches (0.33 millimetres) thick. So if your rudder shell is 3.3 millimetres thick, you will need 10 layers of cloth to rebuild the seam.
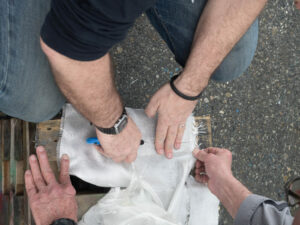
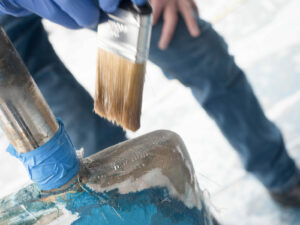
It’s best to use thin, fairly light cloth like six or nine-ounce woven or a biaxial cloth which both drape well. Don’t use mat (too weak) or woven roving (not flexible enough). After filling the crack seam with some thickened epoxy, you should apply the cloth while the epoxy is still wet. We like using epoxy for repairs like this because it bonds better to older polyester resin.
Stagger the widths of the cloth pieces by about one inch (25 millimetres) and apply the largest layers first. For our 10 layers of nine-ounce cloth repair, we used three layers eight inches (200 millimetres) wide (four inches (100 millimetres) either side of the seam), three layers six inches wide, two layers four inches wide and finally two layers two inches wide.
Once the repair cures it can be faired in if needed. In our case the top of the rudder looked tidy enough—so we just applied bottom paint.
Weekend Pirate went back in the water on schedule, but we added a new line to our maintenance routine. Now all the boats will have their rudders thoroughly inspected every time they are hauled-out or anytime they experience an impact.
Editor’s Note: We recommend applying the smallest fiberglass patches first, gradually increasing the size of each patch so that each subsequent layer bonds with the original substrate rather than just to the previously laid fiberglass. However, this is a matter of personal preference and can be situation dependant.
Inspecting a Rudder:
· Look it over with a flashlight—look for cracks along all of the seams, signs of moisture, bulges or anything that doesn’t look right.
· Check for play—move the wheel or tiller while holding the rudder. Feel for any signs of movement inside the rudder.
· Inspect the bearings (internal rudders). Internal rudder plain bushing type bearings can gradually wear (listen for a solid ‘thunk’ sound when the rudder is moved or play in the tiller). Larger rudders can be fitted with roller bearings which sometimes fail by binding in a more sudden manner. Every time you haul the boat out, grip the bottom of the rudder and apply sideways force back and forth. The rudder should feel stiff and not have noticeable play in the bearings. It should turn smoothly and evenly in the bearings when turned.
· Inspect pintle and gudgeons (outboard rudders). External rudder pivot hardware is pretty simple to inspect from the dock or a dinghy and if made of bronze should be quite reliable. Corrosion of stainless steel can be a bit more hidden, so look for cracks or other signs of problems. Mild rust staining is common and not usually a cause for concern.
· Check that the rudder is still vertical. Have a helper turn the rudder from the cockpit and see if pivots evenly from one side to the other.
Note: If you think the rudder will need to be removed during a haul-out, discuss this in advance with the boatyard crew so it can be done with the boat high in the air. Digging a hole in the boatyard’s pavement so the rudder can be fully lowered is never a good solution.